
Gabbi knew that real estate was the right career from the start. She is now dual licensed in both Kentucky and Ohio. She had her first sale within a month of getting licensed and hit her first million in volume within her first 6 months. She will have her real estate license for the rest of her life. Call her anytime if you have questions about becoming a real estate agent. She loves to share her passion for real estate with others!
Budget-Friendly Bathroom Remodel Ideas
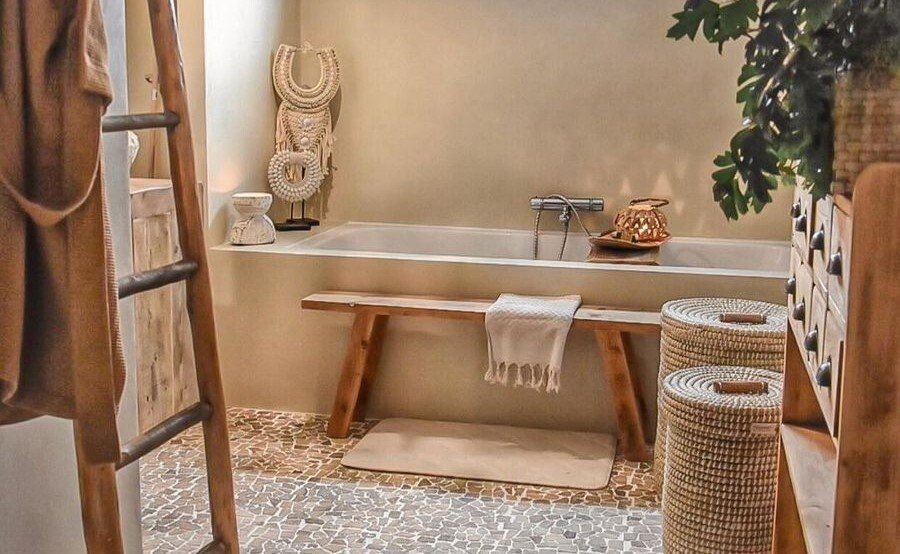
Being a new homeowner comes with plenty of monthly costs. But upgrading a bathroom or updating paint color can go a long way when it comes to resale value. Today I am going to walk you through simple, inexpensive steps to renovate your bathroom on a budget. This is a guide for anyone who is not handy or does not have tons of cash to shell out for a complete bathroom makeover. I am basing these steps on how I did my bathroom upgrade, will include a YouTube link and product recommendations that I used along the way.
Step 1: Visualize your renovations.
Here is the first step to creating your new space. Go into your current bathroom and figure out why you don’t like the space and what is making it feel dated. Because we are beginners and not interior designers, I will give you a list of items to review with a budget-friendly solution to consider.
Items to analyze and solutions:
- Colors. What is the color of your bathroom? Cool tones and silver metal details? A mix of copper and stainless steel? Warm tones? What don’t you like?
- Solution: Pick a color scheme and make sure everything in the room plays into that choice. Having everything match, including minor details like doorknobs and shower hardware, is a great way to polish your space. Warm tones include gold and copper finishes. Cool tones include silver and stainless-steel finishes. Black and white can go with either tone.
- Vanity. Does your vanity seem dated or tarnished? Do you need to replace the whole thing, or can you work with what is there? Do the knobs on the drawers match the bathroom facet and other metals in the room?
- Solution: A great way to save money is to paint your vanity. If it’s a wood fixture, then paint can change the entire feel. Updating the facet and the knobs on the vanity will also give it a whole new vibe.
- Light fixture. Again, look at the color of the fixture and see if it matches everything else in the room. The light fixture can sometimes be the item that’s dating the entire space.
- Solution: Sometimes starting fresh and adding a new light fixture is the only option. Make sure it matches the tones that you pick for everything else.
- Organization. Is your bathroom messy? Are there items that are constantly laid out?
- Solution: This is your chance to go through all the products that you own and throw out any excess items that you don’t use. Use this opportunity to organize your products and find a home for everything. Put the items you use daily in an easy-to-reach place and make sure you purchase small organization bins to keep inside your vanity.
- Linens. Are your towels mismatching and stained? Do you have a shower curtain that needs replacing?
- Solution: Go on Amazon and purchase either cool-toned or warm-toned towels. Fresh matching hand and bath towels will bring your space together. Avoid white because they are easily stained. Get a new shower curtain that also matches your desired look. Don’t be afraid to try a fun print here because it can be easily changed.
- Cabinets: Do you have a medicine cabinet in this space? If you do, does it match your vanity or does it seem like an afterthought?
- Solution: There are plenty of inexpensive shelving options on Amazon. If you don’t have a ton of bathroom items to store, go for open shelving. Keep it simple by storing a candle and jars full of tips or cotton balls. If your current cabinet doesn’t match your vanity, consider painting it to match.
- Mirror: Does your mirror fit the space? It is too big or too small?
- Solution: Mirrors can be expensive. If it’s the frame that is bothering you, consider painting or replacing it. If you need to replace it entirely, go with some inexpensive options on Amazon. The cheapest you will find is usually around $100 but having a new mirror can make a big difference. Don’t be afraid to play around with the shape. A circular frame can make the room feel more modern.
- Décor. Is there any décor? Does it feel crowded?
- Solution: Sometimes bathrooms can feel cluttered. Keep things simple. Have one candle and keep flat surfaces clear so that the space can be easily cleaned. Adding colorful bath rugs can brighten your space without cluttering it.
Step 2: Create your budget.
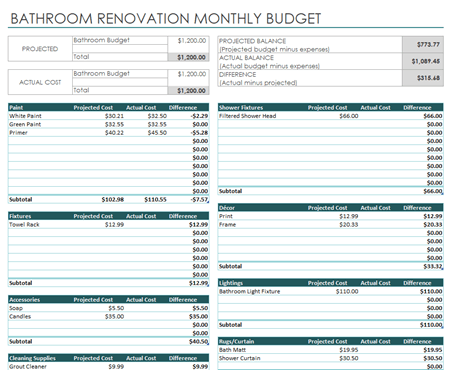
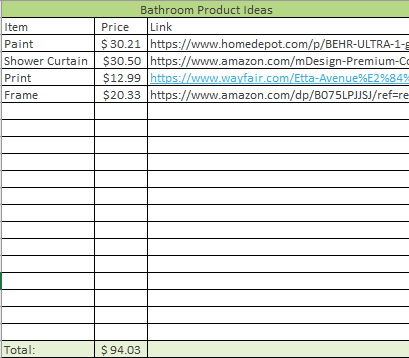
A great way to bring your idea to life is to have an organized plan. You should start with a budget. There are many pre-built budgets that you can use and are probably already on your desktop. Go to Excel, click File, then New, then click on the “personal monthly budget” template. From there, it will give you a blank worksheet that is easy to manipulate for your needs. Replace the word “income” with “budget” and get started organizing your bathroom renovation expenses. Then, on a second page, create a chart that has three sections: item, price, and product link. This will keep you organized so that when it’s time to purchase your products, you will have all the links handy. If you cannot find this specific blank template on your computer, feel free to email me at gabrielle@perryrealestatecollege.com, and I can send you a blank copy of this spreadsheet.
Example Bathroom Renovation Budget:
Example Product Link Page:
Step 3: Purchase the basics.
If you are like me and starting from scratch, you’ll probably need to take a trip to Home Depot to pick up the basics. I am not handy… yet. But I am learning as I go. I am going to give you a start-up list of items that you’ll need for the basics of this project. I will include rough estimates of prices from products I recently bought.
Basic Supply List:
- Grout cleaner and brush: Use this to clean the grout in between old tiles to make the space feel new again.
- Price: $11.43
- White paint: This can be used to re-paint the trim and door.
- Price: $16.98
- Beige wall paint: My bathroom walls were white and I felt like they washed out the room, so I chose beige paint to warm up the space.
- Price: $37.98
- Primer: Use primer on the walls, trim, door, and any furniture that you are re-painting which could include your vanity, mirror, or cabinet.
- Price: $13.98
- Extra-fine sanding block: If you are repainting any wood furniture, you will need to sand it before and after priming.
- Price: $8.47
- ScotchBlue painter’s tape: You will need this to tape off the door and trim when painting the walls and furniture.
- Price: $7.48
- Rubber gloves: You will want these when you are working with harsh chemicals. You will also want protection if you are stripping old paint.
- Price: $5.98
- 8-piece Painting Kit: If this is your first do-it-yourself project, you’ll need to get a basic paint kit. It comes with a paint stirrer, small and big roller brushes, a single paintbrush, and a paint tray that will help you get started. You will also want to purchase a tarp to cover the floors while you paint, especially if you are new to painting walls. There are bound to be mishaps.
- Price: $10.97
- TSP: Trisodium phosphate is used to properly clean your vanity or mirror so that it’s ready to be sanded and primed.
- Price: $8.17
- Extra-large sponges: You’ll want a fresh set for when you are cleaning and prepping for paint.
- Price: $9.17
- Wood filler: This is a product that repairs and fills in small defects in wood furniture. You can use this to refinish your vanity, cabinet, or mirror before priming and painting.
- Price: $11.48
These prices are from the products that I found on Home Depot’s website. I had all of them shipped directly to my door. Hopefully these tools will get you started on the right foot, if worst comes to worst, visit your parent's house and see if they have any of these products in the garage.
Step 4: Select and order upgraded bathroom products and fixtures.
A great way to start the process of picking out your new fixtures is to look at magazines or on Pinterest to find inspiration. Another great way is to download your favorite store's app and start scrolling through their products for ideas. I like the style of Urban Outfitters and Anthropology for furniture. Once I find the look I am going for, I use my inspiration pictures to find “dupes” of these products on more affordable sites like Amazon, OverStock.com, and Wayfair. You’d be surprised how many similar products are out there without the designer price tag. Be specific with your search terms to find the best results.
Step 5: Deep clean and remove old fixtures.
Call your mom, friend, or significant other, blast some music and get to work cleaning the entire space. Takedown any fixtures so that you can clean behind them and scrub any old tile work that you are not replacing. You’d be surprised at how different a room can look after a deep clean.
Step 6: Fix small defects and paint.
Once you take down all your old hooks and fixtures, there will likely be scuffs and small holes. You will want to repair these defects before you begin priming and painting. If you are repainting a wood piece like your vanity, mirror, or cabinets, you will want to follow these steps below.
Re-painting wood furniture:
- Clean item.
- Take off any knobs and all doors with a screwdriver.
- Use TSP to strip the surface layer.
- Rinse with water.
- Sand the entire item and fix small wood defects with wood filler.
- Prime wood.
- Sand again.
- Paint.
- Paint a second coat.
Here’s a link to a YouTube video that outlines this process if you are a visual learner: https://www.youtube.com/watch?v=JiHWP8UJOqQ
Step 7: Hang and install new bathroom fixtures.
I had to call my dad for this part of the process. I have tried to hang things by myself and have been somewhat successful in the past. However, drilling in a whole new light fixture is above my head entirely. If you don’t have someone to call for this part of the process, try using websites like Angi.com or TaskRabbit to find local contractors that you can pay by the hour. Be sure to include this cost in your budget. If you are replacing fixtures in your shower or facet hardware, I would also suggest hiring a professional. Those are tasks you need to get right the first time, or you will run into trouble down the road. Tasks such as hanging hooks or replacing knobs on your vanity can be done by yourself with some patience and a screwdriver.
Step 8: Accessorize and decorate your new space.
This is the best part because you get to see your whole space come together. Put out a new candle, place down your new bathmats, and hang your new towels. Make sure to get a soap holder that fits your color scheme to tie everything together.
I was able to transform my space for $1130.38. I cut costs on labor by doing a lot of the remodel myself and by getting help from my dad. I spent most of my budget on a new mirror, a new cabinet, and new copper hardware in the shower. I painted my old vanity from brown to a deep green and updated the lighting as well. I also splurged on a few small décor pieces from Anthropology to bring the space together. I hope that this guide was useful to all you knew homeowners trying to make your space your own on a budget. For more tips and guides, look for new updates on the Career Corner. If you have any questions, feel free to email or call me at any time.
About the Author

Recent Posts

Understanding real estate market indicators is essential for making informed decisions, whether you're a buyer, seller, investor, or real estate professional. By analyzing key metrics, you can gauge market health, anticipate trends, and effectively communicate insights to clients and audiences.
Real estate is a career that offers flexibility, unlimited earning potential, and the ability to work well into your later years. However, unlike traditional jobs with employer-sponsored retirement plans and steady salaries, real estate agents must take charge of their own financial future. As you age in the industry, planning for taxes, retirement, and financial stability becomes even more critical.

If you're thinking about becoming a real estate agent in 2025, you're in good company! Real estate is a dynamic and rewarding career with flexible schedules, unlimited earning potential, and the opportunity to help people find their dream homes. But before you start selling houses, you'll need to get a license. Here’s a comprehensive guide on what it takes to become a real estate agent in the U.S. in 2025.

In real estate, your personal brand is everything. It’s how clients perceive you, trust you, and ultimately choose you over the competition. Whether you're an agent just starting or a seasoned pro looking to refine your identity, creating a strong and recognizable brand is key to long-term success. Let’s dive into what it takes to establish and maintain an impactful personal brand in real estate.

If you’re considering a career in real estate and you’re looking at both Ohio and Kentucky, you’re not alone. I’ve worked in both states, and while they share some similarities, there are key differences in licensing requirements, market conditions, and career opportunities that every aspiring agent should know. Understanding these differences can help you decide which state is the right fit—or if getting licensed in both makes sense for your goals.

Becoming a real estate agent in Ohio can be an exciting and rewarding career move, but it’s not without its challenges. When I first started in the industry, I made a few mistakes that slowed my progress—and I’ve seen plenty of new agents struggle with the same issues. If you’re looking to get your real estate license in Ohio, here are the top five mistakes to avoid so you can start your career on the right foot.

If you’re a young real estate agent looking to build a successful business in 2025, your strategy should be digital-first, automation-focused, and centered around social media. Traditional methods still work, but today’s top-performing agents are leveraging tech, branding, and smart systems to scale their business efficiently. Here’s a step-by-step guide to creating a real estate business plan that aligns with modern marketing and automation strategies.

The real estate industry is vast, and while being a generalist can work, many agents find that specializing in a niche can lead to greater success. Focusing on a specific market allows you to refine your expertise, stand out from the competition, and attract the clients you truly want to work with.

Are you ready to become a full-time real estate agent? The first thing you need to evaluate is—what does being a part-time agent currently look like for you? Every real estate business is different, and before making the leap to full-time, it’s important to assess whether you’re truly prepared for this next step.

If you’re a licensed real estate agent, you already know that your education doesn’t stop once you pass the exam. Continuing Education (CE) is a crucial part of maintaining your license, but it’s also an opportunity to grow in your career. Every state has its own CE requirements, so it’s essential to stay informed and compliant with your local laws to avoid penalties or even losing your license.
Understanding real estate market indicators is essential for making informed decisions, whether you're a buyer, seller, investor, or real estate professional. By analyzing key metrics, you can gauge market health, anticipate trends, and effectively communicate insights to clients and audiences.
Real estate is a career that offers flexibility, unlimited earning potential, and the ability to work well into your later years. However, unlike traditional jobs with employer-sponsored retirement plans and steady salaries, real estate agents must take charge of their own financial future. As you age in the industry, planning for taxes, retirement, and financial stability becomes even more critical.
If you're thinking about becoming a real estate agent in 2025, you're in good company! Real estate is a dynamic and rewarding career with flexible schedules, unlimited earning potential, and the opportunity to help people find their dream homes. But before you start selling houses, you'll need to get a license. Here’s a comprehensive guide on what it takes to become a real estate agent in the U.S. in 2025.
Let's Stay Connected
Follow us on and become part of the PREC community
Never miss a tweet by connecting with us on Twitter
Check our our posts about trends in real estate industry and market
